How to make 12v accessory ports permanently live?

Mitsubishi Outlander PHEV Forum

Help Support Mitsubishi Outlander PHEV Forum:

This site may earn a commission from merchant affiliate links, including eBay, Amazon, and others.
The easy way to make your 12v accessory sockets permanently live.
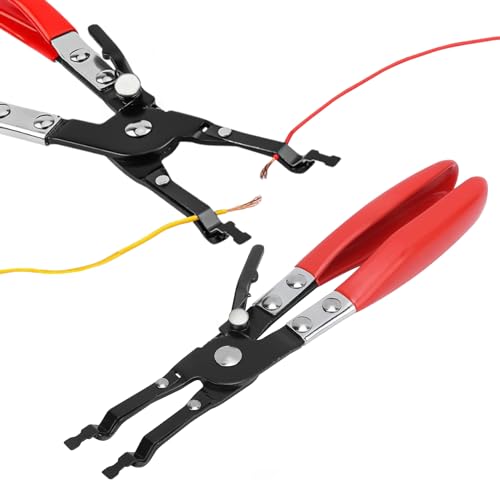
Get two mini size piggy back fuse adapters. Connect their "new accessory" wires together using an appropriately rated connector. Remove fuses 7 and 23. Put these fuses in the "new accessory" positions in the piggyback adapters. Put one in position 7 the "correct" way round i.e. as if you were taking power to a new connection. Put the other in position 23 the "wrong" way round i.e. with the common side connected to the accessory sockets wiring. Do not fuse either of the "original" fuse positions on the adapters. Your 12v accessory ports will now be permanently live, fed from fuse point 7. You will be putting two 15 Amp fuses in series, but in the event of the current exceeding that, either or both will blow, still protecting the circuit. Reverse the procedure to put things back to the original arrangement, with no alterations to the original wiring.

Edit: Sorry, You need mini size adapters, not micro size as I originally wrote. Now changed above. Didn't realise there were micro size adapters available!
 
Hi, I have concern about powering my dashcam on a permanently live feed.

On the great advice of Techmoan.com (great dashcam reviews) i brought the Ddpai M6+ dashcam - https://www.amazon.co.uk/DDPai-M6-p...&qid=1482961499&sr=8-1&keywords=ddpai+m6+plus and the hardwire cable https://www.amazon.co.uk/Boblov-Ori...&qid=1482961499&sr=8-3&keywords=ddpai+m6+plus from amazon. I liked the park mode feature which needed a permanent live power.

I asked my Mitsubishi dealer's service dept to install it but they said this was not possible as there were NO Permanent feed and they could only hardwire it to an ignition feed. I wanted a second opinion and took it to a local car electronic installers who essentially said the same thing. They did install it (cheaper than the dealer) - but i now have a useless park mode function.

Now I've read this thread and i'm thinking is there a way to rectify this. I've shown Regulo's post above to the local car electronic installer who said - 'i can try it but i'm taking NO responsibility, if something goes wrong its on your head'. This shook me up. I'm not electronically minded and would never dream of doing anything like this myself. Anyone have any words of advice or signpost me to someone who can help locally - i'm in nottinghamshire.

Cheers
Herbie
 
hvaghela said:
Hi, I have concern about powering my dashcam on a permanently live feed.

On the great advice of Techmoan.com (great dashcam reviews) i brought the Ddpai M6+ dashcam - https://www.amazon.co.uk/DDPai-M6-p...&qid=1482961499&sr=8-1&keywords=ddpai+m6+plus and the hardwire cable https://www.amazon.co.uk/Boblov-Ori...&qid=1482961499&sr=8-3&keywords=ddpai+m6+plus from amazon. I liked the park mode feature which needed a permanent live power.

I asked my Mitsubishi dealer's service dept to install it but they said this was not possible as there were NO Permanent feed and they could only hardwire it to an ignition feed. I wanted a second opinion and took it to a local car electronic installers who essentially said the same thing. They did install it (cheaper than the dealer) - but i now have a useless park mode function.

Now I've read this thread and i'm thinking is there a way to rectify this. I've shown Regulo's post above to the local car electronic installer who said - 'i can try it but i'm taking NO responsibility, if something goes wrong its on your head'. This shook me up. I'm not electronically minded and would never dream of doing anything like this myself. Anyone have any words of advice or signpost me to someone who can help locally - i'm in nottinghamshire.

Cheers
Herbie

If there is no permanent feed my Ddpai M6+ must be powered by fairy dust :)

The park mode is awesome, I wired it in myself with a bit of help from this forum.

I ordered
  • Mini Blade Fuse Holder Piggy Back Tap: https://www.amazon.co.uk/gp/product/B01E3PQWUE/
  • Cigarette Lighter Female Socket https://www.amazon.co.uk/gp/product/B00QLLF926/

1. Soldered them together and insulated the wires, put a spade connector on the negative.
2. Removed the glove box (see PHEV manual)
3. Connected the negative to earth via a nut at the bottom of the fusebox, I think a 10, 11 or 12mm mini socket set with extension bar was required.
4. Tapped into the accessory fuse position (see PHEV manual) and used a suitable fuse for the Dashcam feed, I think I have a 5amp fused in there.
5. Route the wires through the trim / cable tie and stick the excess in the glove box.
6. Reassemble the glove box.

That's it :)
 
Do it Solarboy's way, or my way - it works. Fuse 7 is permanently live and doesn't seem to connect to anything else, as far as anyone knows. I've had mine connected for over a month now, and just pull the plug from ciggy/accessory socket when I garage it at night.
 
Regulo said:
Do it Solarboy's way, or my way - it works. Fuse 7 is permanently live and doesn't seem to connect to anything else, as far as anyone knows. I've had mine connected for over a month now, and just pull the plug from ciggy/accessory socket when I garage it at night.

I leave mine going 24/7 ... no problems so far.
 
In case my descriptive powers are not as clear as we'd like . . .

x5bawx.jpg
 
Hi SolarBoy and Regulo thanks for all your advice.
I think I'm going to give it a go next year - no time this year.
My current issue is I don't know how the car electronic installers hardwired the camera. I'll need to talk to them or take out the glove box out and find out myself.

Herbie
 
SolarBoy said:
I've got some photos of my install, taking out the glove box is simple enough does require a bit of brute force!

Cheers. I think that would be really helpful for me and others.
 
. . and you'll need to use the fuse puller kept in the engine bay fuse box to get the fuses out. I found it a bit fiddly, but I've got fingers like bananas! There's really nothing to worry about, the glove box is one of the easiest to get out, in my experience. Squeeze in at the sides, lever off the strap with a screwdriver, and pull it off the lower mountings.
 
The manual also shows some pictures for removing the glovebox. Go to the section about the fuses.
 
Tools required:

  • Wire strippers
  • Long nosed pliers
  • Screwdriver or a soldering iron
  • Mini-socket set with an extension bar, somewhere between 10 to 12mm socket requried
  • Common sense
  • Dexterity of a hummingbird

Parts:

  • Mini Blade Fuse Holder Piggy Back Tap: https://www.amazon.co.uk/gp/product/B01E3PQWUE/
  • Cigarette Lighter Female Socket https://www.amazon.co.uk/gp/product/B00QLLF926/
  • A spade connector
  • Section of black wire same diameter as the tap
  • Heat shrink tubing, at a pinch could subsitute for electrical tape
  • A mini 5 Amp fuse to replace the 20Amp fuse that came with the tap

Glove box is removed as per the manual, brute force and ignorance is required as well as some tool use.

1. Lead I made up from the tap & socket mentioned earlier, I soldered this together but crimp or choc-box connectors wrapped in tape would also work. Common sense is needed here.

339jbxz.jpg


2. Location of the earthing point for the negative lead:

This is tricky to get to, needs a mini-rachet and I can't remember the size, was somewhere between 10 and 12mm. Patience was required to get this. You don't need to remove the screw, just loosen it so the spade connector can be pushed into place. This is where you'll need the dexterity of a hummingbird to hold the spade in place, and tighten the screw.

nxow77.jpg


3. Negative lead connected to earthing point:

i23b0y.jpg


4. Fuse tap in place, make sure it is inserted the correct way around, you'll need to test the fly lead with a multimeter. Mine went into the accessory fuse as per the owners manual. You'll need thin pliers to get the first one out, I wrapped the ends with electrical tape just as a precaution against damaging or shorting anything out.

2le2o89.jpg


5. Socket and leads hidden inside the glove box:

2aihqbp.jpg


6. Run the USB cable around the trim, it routes easily around the windscreen, then taped it on the inner corner of the door jam then into the glove box.

Any questions let me know?
 
Thanks again Solarboy. Great pics gives a newbie a better understanding about is going on.
I'm all psyched up to give it a go. The installer has taken an arm and a leg of me, I want to get it right.
I spoke to the installer today- he hardwired it directly to the cigarette lighter on the front dash.
That being the case Regulo's option seems more appropriate at the moment.
using an appropriately rated connector.
What do you mean Regulo by a rated connector?
 
hvaghela said:
Thanks again Solarboy. Great pics gives a newbie a better understanding about is going on.
I'm all psyched up to give it a go. The installer has taken an arm and a leg of me, I want to get it right.
I spoke to the installer today- he hardwired it directly to the cigarette lighter on the front dash.
That being the case Regulo's option seems more appropriate at the moment.

I'm a newbie too :lol: though I've done my own car electrics ever since I was 18, which was quite some time ago.

Oh, wired to the cigarette lighter ... how very lazy, and isn't possible to return the car back to it's original specification as wires have been crimped/cut or spliced.

Maybe I should make up these looms and sell them :lol:

I don't have any experience of Regulo's solution.
 
Just one that will handle at least the peak current of the fuses you use. I used the original fuses (15A), so any connector of that rating or above. I used a screw down connector, simply as that was lying in my toolbox! Don't use lower value fuses because that would limit the capacity of both accessory ports.
 
Ok so here goes. I've bought the Mini Blade Fuse Holder Piggy Back Tap and a 15amp connector block off amazon.
I've already tried get the glove box off and its not too bad.
I've done a crude drawing and labeling of what i'm going to do this weekend:

:oops:
Sorry can't upload the pic from my phone. Its essentially Regulo's diagram with the real items.
Fingers crossed.

Herbie
 
Likewise, if near South Essex. But I'm sure you'll have no problem. If you're doing it my way, once you've joined the fuse adapters, it's a ten minute job.
 
:D :D :D :D
SUCCESS!!!!
Thanks to everyone, especially Solarboy and Regulo.
My accessory ports are now permanently live and my Ddpai M6+'s park mode works.

Now I need to think about a rear dashcam.
 
Glad we could help! Now, I've been pondering a rear dash-cam too, and I'm wondering where the original fuse 7 is wired to (if it's wired at all)? It just says accessory in the manual, but someone previously thought it might be for a towbar install. If that's so , might the wiring loom have a connector lying about spare in the boot somewhere? It'd make it a lot easier if anyone could find one.
 
Back
Top